


How to use a kitchen knife


●Knife's home position
Photo 1
Stand parallel to the cutting board. Step your right foot slightly back so that your pelvis forms approximately a 45-degree angle to the cutting board.
Photo 2
Holding the knife, align the blade at a 90-degree angle to the cutting board when viewed from above.
Photo 3
Align the knife so that it remains at a 90-degree angle to the cutting board when viewed from the front.
Photo 4
Place the knife on the cutting board so that the straight portion of the cutting edge rests naturally on the surface.
This is called the "Home Position."
Most cutting tasks in everyday cooking begin from the Home Position.

①

②

③

④
包丁の直線部分が落ち着くところ
Q: Why should I start from the Home Position when using the knife?
A: The Home Position helps maintain a stable and consistent cutting form.
Starting a cut directly on top of the ingredient can make it difficult to establish a smooth rhythm and may result in uneven slice thickness.
It can also lead to using a swinging motion when a sliding cut would be more appropriate for the task.
●Cat's paw

Lightly curl your fingers into a loose fist,
with your thumb tucked inside your index finger.
The claw grip can be formed using either the index finger or the middle finger. We recommend using the middle finger, as it reduces the need for repositioning and helps produce more consistent slices with greater efficiency.
Starting from the Home Position, raise the knife only until the blade clears the height of the ingredient. Listen for the change in sound and feel for the change in vibration as the blade passes above the food. Once you recognize this point, avoid lifting the knife any higher.
Limiting unnecessary blade movement improves both safety and control.
Place the first knuckle of your middle finger lightly against the side of the blade and continue cutting.
Keep the position of your middle fingernail fixed. As your middle finger begins to straighten or rise, reposition it and repeat the process.
This helps maintain consistent slice thickness and provides better control throughout the cut.


NG

NG

NG

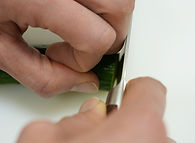
Do not keep your fingers straight while cutting, as this increases the risk of injury.
If your guiding finger is too far from the blade, it becomes difficult to maintain a consistent cutting thickness.
NG
NG
Keep your little finger and thumb safely tucked away. Fingers that protrude beyond the grip are at greater risk of being cut.
●Sliding Cut
Photo 1
Start from the Home Position.
Photo 2
Raise the knife straight up while keeping it parallel to the cutting board.
Photo 3
Move the knife forward and return to the Home Position.
The Sliding Cut allows for fast, stable, and controlled cutting. It also produces a smooth, glossy cut surface on the ingredient.
This technique is particularly effective when cutting relatively small ingredients.
①
②
③


Maintain a smooth and consistent rhythm while cutting, as demonstrated in the video.
●How to Use the Universal Edge

People who are accustomed to using double-bevel knives often find that they cannot make straight slices with a single-bevel knife at first, as shown in the photo.

When using a single-bevel knife, it helps to imagine slightly tilting the blade to the left as you cut.
The angle shown in the photo is exaggerated for illustration purposes, but for those who are accustomed to double-bevel knives, keeping this slight leftward tilt in mind can help produce straighter cuts.

The leftward tilt is only a mental image to help guide the cutting motion.
In practice, when making very thin slices of approximately 1 mm with a single-bevel knife, the blade can be held perpendicular to the cutting board and still produce straight cuts.
This is because the sliced portion naturally bends and separates to the right, reducing the lateral force that would otherwise cause the blade to drift.
Practice 1: Thin Slicing and Julienne Cutting with the Sliding Cut
We recommend starting with cucumber half-moon slices.
Imagine tilting the knife slightly to the left and cut with a smooth, steady rhythm.
As your skills improve, practice thin slicing and julienne cutting with daikon radish and carrots.
Rather than thinking of it as "cutting," imagine that you are gently "shaving" the ingredient.
Practice 2: Cutting Hard Ingredients into Thick Slices and Halves
When cutting hard ingredients into thick slices, achieving a straight cut can be challenging until you become accustomed to using a single-bevel knife.
Tilt the knife slightly to the left while cutting.
Another useful tip is to use the tip section of the blade, where the blade is thinner.

By keeping a slight leftward tilt in mind while cutting, you can achieve nearly straight cuts even with a single-bevel knife.
Choose which part of the blade to use based on the ingredient and the type of cut you want to make.
For thicker cuts and irregular cuts, such as those shown in the first half of the video, use the front portion of the blade near the tip. For thin slicing and julienne cutting, use the heel section of the blade near the handle.
Practice 3: Comparing the Universal Edge with a Double-Bevel Knife
The difference becomes clear when comparing thin slicing with a double-bevel knife and a single-bevel knife.
In the video, the first half demonstrates cutting with a single-bevel knife, while the second half demonstrates cutting with a double-bevel knife.
●Seamless Sharpening
The Seamless Sharpening method can be used on knives with blades that have some flexibility.
Place the edge diagonally across the whetstone and raise the blade to an angle of approximately 18–20 degrees. Maintain this angle and sharpen as shown in the video.
After sharpening, test the knife. If the cutting performance has improved, you have sharpened at the correct angle. If not, try raising the blade slightly higher and sharpen again.
To finish, lightly remove the burr from the left side of the edge.
For typical household use, we recommend sharpening for about one minute once a week, although the frequency will vary depending on how often the knife is used.